When developing Python projects, managing dependencies and packages efficiently is crucial. Have you ever faced the frustration of installing one package for a project only to find it conflicts with another project’s requirements? This is where virtual environments come to the rescue. They provide isolated spaces for your Python projects, allowing you to manage dependencies independently without affecting your system-wide Python installation or other projects.
In this lesson, we'll explore what virtual environments are, why they are essential, and how to create, activate, and use them effectively. By the end, you will be equipped to maintain clean, conflict-free Python projects with ease.
What Exactly Is a Virtual Environment?
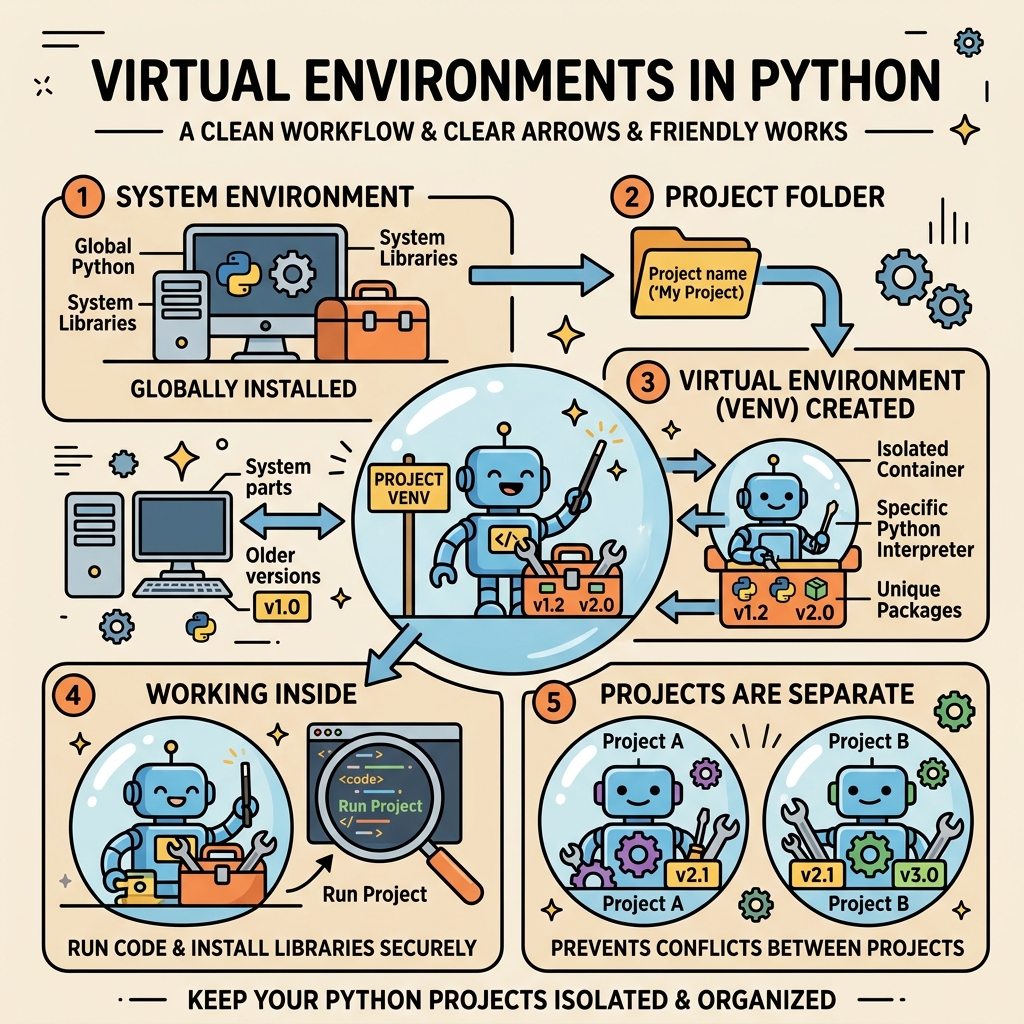
A virtual environment is like a self-contained directory that holds all the Python executables, packages, and dependencies specific to a project. Imagine it as a sandboxed workspace where you can install packages without worrying about interfering with other projects or the global Python installation.
When you activate a virtual environment, your shell session uses the Python interpreter and packages from that isolated directory rather than the global Python setup. This isolation ensures that projects can have different versions of the same package installed simultaneously.
💡 Why Use Virtual Environments?
Think of virtual environments as separate "bubbles" for your projects. Without them, all packages install globally, which can lead to version conflicts and "dependency hell." Virtual environments keep your projects tidy and reproducible.
How Do Virtual Environments Work?
Under the hood, a virtual environment contains:
- Python interpreter copy or symlink: A version of Python executable dedicated to that environment.
- Site-packages directory: A folder where all third-party packages are installed.
- Scripts/Executables folder: Tools like
pipthat operate within the environment.
When active, commands like python and pip point to the executables inside the virtual environment, ensuring you’re working with the environment’s packages and not the global ones.
| Global Python | Virtual Environment |
|---|---|
| Packages shared across all projects | Packages isolated per project |
| Risk of version conflicts | Separate versions possible |
| Requires admin privileges to install packages globally | Install packages without admin rights |
| System-wide changes affect all projects | Changes limited to one environment |
Creating a Virtual Environment
Starting with Python 3.3, the venv module is included in the standard library, making virtual environment creation straightforward without external tools. Here’s how to create one:
- Open your terminal or command prompt.
- Navigate to your project directory or create a new folder for your project.
- Run the following command to create a virtual environment named
venv:
📌 Deep Dive: Creating a Virtual Environment
python3 -m venv venvvenv directory.This command creates a new directory venv containing the isolated Python environment.
💡 Naming Your Virtual Environment
While venv is a conventional name, you can choose any folder name. Just remember it, so you can activate it later.
Activating the Virtual Environment
Before using the environment, you need to activate it so your terminal session points to this isolated Python and its packages.
The activation command depends on your operating system and shell:
- Windows (Command Prompt):
📌 Deep Dive: Activating on Windows CMD
venv\Scripts\activate.bat- Windows (PowerShell):
📌 Deep Dive: Activating on Windows PowerShell
.\venv\Scripts\Activate.ps1- macOS / Linux (bash/zsh):
📌 Deep Dive: Activating on macOS/Linux
source venv/bin/activateNotice the prompt changes to include (venv) indicating the environment is active.
⚠️ Activation Scripts Execution Policy (Windows PowerShell)
If you receive a permission error when activating in PowerShell, you might need to change the execution policy temporarily:
Set-ExecutionPolicy -ExecutionPolicy RemoteSigned -Scope CurrentUserAlways understand the security implications before changing execution policies.
Installing Packages Inside the Virtual Environment
With the environment activated, use pip as usual to install packages. These packages will now be installed inside the virtual environment only.
📌 Deep Dive: Installing Packages
(venv) $ pip install requestsInstalling collected packages: requests
Successfully installed requests-2.28.1
To verify installed packages:
📌 Deep Dive: Listing Installed Packages
(venv) $ pip list---------- -------
requests 2.28.1
pip 23.0.1
setuptools 67.1.0
Deactivating the Virtual Environment
Once you finish working inside a virtual environment, you can deactivate it to revert your shell to the system Python:
📌 Deep Dive: Deactivating
(venv) $ deactivateDeactivation restores your PATH and environment variables to normal, so Python commands use the global installation again.
Managing Dependencies with requirements.txt
When collaborating or deploying projects, it's best practice to record your environment’s dependencies so others can recreate it exactly.
Generate a requirements.txt file listing all installed packages and their versions:
📌 Deep Dive: Exporting Dependencies
(venv) $ pip freeze > requirements.txtrequirements.txt with package listThis file can then be used by others to install the exact same versions with:
📌 Deep Dive: Installing from Requirements
pip install -r requirements.txtrequirements.txtCommon Tools Beyond venv
While venv is the built-in and simplest tool, several other virtual environment tools exist that add features:
- virtualenv: An older but widely-used tool supporting Python 2 and additional options.
- pipenv: Combines package and environment management with a simplified workflow.
- poetry: Modern dependency manager and virtual environment tool with a rich feature set.
For beginners, mastering venv is highly recommended before exploring these advanced tools.
💡 Pro Tip
Always create a new virtual environment for each project to keep dependencies clean and avoid conflicts.
Troubleshooting Tips
- Virtual environment does not activate: Check if the activation script path is correct and you have permissions.
- Packages installed but not found: Ensure the environment is activated before running Python scripts.
- Permission errors on Windows PowerShell: Adjust execution policy as explained above.
Summary
Virtual environments are essential for professional Python development. They help you:
- Maintain project-specific dependencies
- Avoid package and version conflicts
- Keep your global Python installation clean
- Reproduce environments easily for collaboration and deployment
Creating and managing virtual environments using the built-in venv module is simple and efficient. Remember to activate the environment before installing packages or running your code, and deactivate when done.
In your ongoing projects, make virtual environments your trusted companion to keep your Python ecosystem clean and manageable.
Quick Knowledge Check
Test what you just learned
Question 1 of 2
What is the primary purpose of a Python virtual environment?
Question 2 of 2
Which command creates a new virtual environment named env?
Loading results...